• Save money on quilling by using recycled paper and shopping for deals.
  • Make your own quilling strips for customization and cost-effectiveness.
  • Choose the right paper for DIY strips to ensure flexibility and weight balance.
  • Recycle materials like magazines and junk mail for vibrant quilling strips.
  • Leverage social media for deals and inspiration in the quilling community.

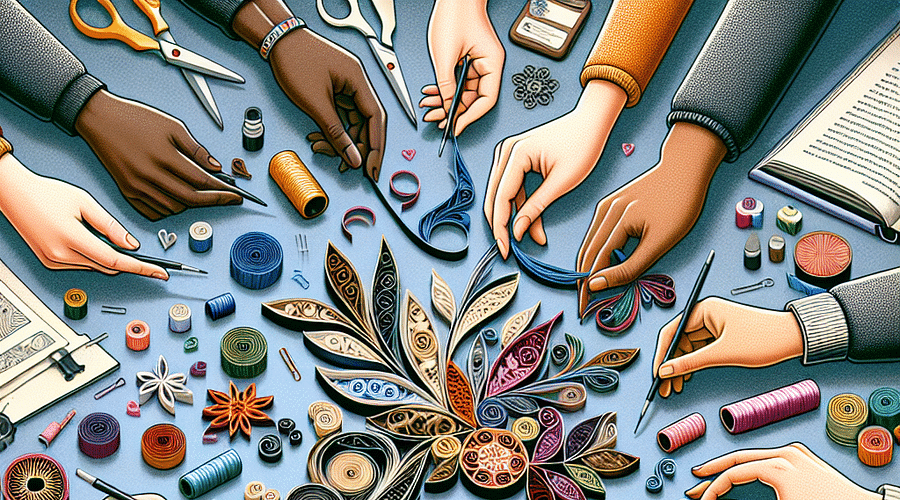
Embarking on a quilling journey doesn't have to strain your wallet. With a dash of creativity and some savvy shopping, you can create stunning quilled art without breaking the bank. Let's explore how you can stretch those dollars and still indulge in the intricate world of paper quilling.

Finding Affordable Quilling Strips

Quilling strips are the backbone of your craft, but they don't have to be the most expensive part. Before you rush to purchase brand-new strips, consider these cost-effective alternatives that are just as effective:

  • Recycling Paper: Old magazines, flyers, or even office paper can be given a second life as quilling strips. Look for papers with interesting colors and textures to add an unexpected twist to your designs.
  • Bargain Bins: Craft stores often have discount sections where you might find quilling strips at a fraction of their original price. Keep an eye out for clearance sales and stock up when prices drop.
  • Online Marketplaces: Sites like eBay or Etsy can offer bulk deals on quilling supplies from other crafters looking to declutter their stash.

When searching for affordable quilling supplies, patience and persistence pay off. Sign up for newsletters from your favorite craft stores to get first dibs on sales and coupons. Combining these offers with the tips above can lead to significant savings over time.

Making Your Own Quilling Strips

Making your own quilling strips is not only cost-effective but also allows you complete control over the color palette and width of your strips. It's easier than you might think, and all it takes is a few simple tools:

  1. Paper Cutter or Slitting Tool: This will ensure that your homemade strips are even and precise.
  2. Quality Paper: Choose paper that is flexible yet sturdy enough to hold its shape when coiled.
  3. Ruler: To measure out strip widths accurately before cutting.

DIY Quilling Strips: A Step-by-Step Guide

crafting materials for paper quilling arranged on a table
Gather Your Materials
Start by collecting the necessary materials: a ruler, a cutting mat, a craft knife or paper cutter, and paper of your choice. For budget-friendly options, consider using colored printer paper, magazine pages, or lightweight cardstock.
measuring and marking paper with a ruler and pencil for quilling
Measure and Mark Your Paper
Using the ruler, measure and mark your paper into equal-width strips. Quilling strips are typically 1/8 inch to 1/4 inch wide. Make small pencil marks along the edge of the paper to serve as a cutting guide.
cutting paper into strips on a cutting mat with a craft knife
Cut the Strips
Place the paper on your cutting mat. Align the ruler with your pencil marks. Use the craft knife to carefully cut along the ruler's edge to create straight, even strips. If you have a paper cutter, you can use it instead for quicker and more uniform cuts.
trimming quilling paper strips to length with a craft knife and ruler
Trim to Desired Length
Quilling strips are usually 22 inches long, but you can trim them to any length you desire. Use your ruler and craft knife to cut the strips to your preferred length.
storing quilling strips in a paper storage box
Store Your Strips
To prevent your strips from curling or getting damaged, store them flat or in a quilling paper storage box. You can also wrap them loosely around a pencil to give them a slight curve, making them easier to coil later on.

If you're new to quilling art, starting with homemade strips can be a great practice run before investing in pre-cut options. There's also a certain charm in knowing every piece of your artwork was crafted completely by hand, from strip creation to final design.

Choosing the Right Paper for DIY Strips

Selecting the correct type of paper is crucial when making your own quilling strips. You'll want a balance between flexibility and weight—too thin, and the paper may tear; too thick, and it won't coil smoothly. Consider using:

  • Cardstock: Ideal for sturdy structures but may require more skill to coil tightly.
  • Construction Paper: A budget-friendly option that comes in various colors.
  • Specialty Papers: Metallic or textured papers can add flair to your projects but may cost slightly more.

Mastering Paper Selection for DIY Quilling

Quilling is an art form that involves the use of strips of paper that are rolled, shaped, and glued together to create decorative designs. The right paper can make all the difference in your quilling projects. Let's test your knowledge on selecting the best paper types for DIY quilling projects.

Tapping into resources like tips for selecting perfect quilling paper strips will guide you through choosing materials that won't compromise quality for cost. Remember that experimentation is key; what works well for one project might not be ideal for another.

Incorporating mastering the basics of using quillings paper strips into your DIY process ensures that once you've created those perfect strips, they'll be put to good use in creating beautiful designs without any unnecessary waste or expense.

Quilling on a Dime

  1. DIY Slotted Quilling Tool
    DIY Slotted Quilling Tool - Use a fine-tipped needle or a toothpick by cutting a small slot to hold the paper.
  2. Quilling with comb
    Combs and Forks - Create consistent loops and patterns by wrapping paper strips around the teeth of a comb or fork.
  3. Plastic clamps for crafting
    Plastic Clamps - Hold your quilling shapes securely as they dry using inexpensive plastic clamps from a hardware store.
  4. Homemade Quilling Board
    Homemade Quilling Board - Use a foam board and pins to make your own quilling board for shaping and sizing.
  5. Needle-nose pliers for quilling
    Needle-nose Pliers - Bend and shape quilling strips with precision using a pair of needle-nose pliers.
  6. Using paintbrushes for quilling
    Old Brushes - Reuse the back end of old paintbrushes to roll and shape quilling strips.
  7. Storage boxes for quilling strips
    Storage Boxes - Organize your quilling strips in reused or inexpensive storage boxes to keep them neat and untangled.
  8. DIY glue spreaders for quilling
    Glue Spreaders - Make your own with plastic cards or use small, inexpensive paintbrushes for applying glue precisely.

To delve deeper into this economical crafting adventure, don't hesitate to explore further resources such as our comprehensive guides on making quilled art using homemade strips, or our beginner's journey through crafting quilled flowers, which can provide additional insights into maximizing both creativity and cost-efficiency in your work.

DIY Quilling Strip Cutting

For those who truly want to dive into quilling on a budget, making your own quilling strips is a game changer. Not only does it cut costs, but it also allows for greater customization of colors and widths. All you need is a steady hand, quality paper, and a precision cutting tool. Start by selecting colored paper or cardstock that matches your project needs. Use a ruler and an exacto knife or paper cutter to create strips of consistent width. Remember, standard quilling strips are 1/8 inch wide, but feel free to experiment with different sizes for varied effects.

DIY Quilling Strips: A Step-by-Step Guide

crafting materials laid out on a table
Gather Your Materials
Start by collecting the necessary materials: a ruler, a cutting mat, a craft knife or paper cutter, and paper sheets in your desired colors. The paper can be standard printer paper, construction paper, or specialty quilling paper if you find it on sale.
ruler measuring and marking paper
Measure and Mark Your Paper
Using the ruler, measure and lightly mark your paper to the width you want your quilling strips to be. Standard quilling strips are 1/8 inch wide, but you can choose to make them wider or narrower based on your project needs.
cutting paper into strips on a cutting mat
Cut the Strips
Place the paper on your cutting mat. Using the craft knife or paper cutter, carefully cut along the marked lines to create your strips. If you're using a craft knife, make sure to use a straight edge as a guide to ensure your strips are even.
organizing paper strips into a storage box
Store Your Strips
Once you've cut your strips, store them in a way that prevents them from bending or crinkling. You can use a storage box, a plastic organizer, or even make your own paper strip holder from an old shoebox.
assorted colorful paper strips
Mix and Match
Don't be afraid to mix and match paper types and colors. Combining different textures and hues can add an interesting dimension to your quilling projects and make them uniquely yours.

Recycling and Upcycling Materials

In the spirit of sustainability and cost-saving, consider recycling and upcycling materials for your quilling projects. Old magazines, flyers, and even junk mail can be transformed into vibrant quilling strips. Look for pages with colorful graphics or interesting textures that can add uniqueness to your designs. This method not only saves money but also contributes to eco-friendly crafting practices.

Recycle & Quill

  1. magazine pages
    Old Magazines - Glossy and colorful pages for vibrant quilling.
  2. shredded office paper
    Shredded Office Paper - Reuse strips from a paper shredder as a quilling material.
  3. wrapping paper texture
    Wrapping Paper - Thin and decorative paper ideal for quilling projects.
  4. old book pages
    Old Books - Pages from damaged or discarded books can be repurposed.
  5. junk mail paper
    Junk Mail - Turn unwanted mail into quilling strips for practice.
  6. newspaper texture
    Newspaper - Black and white strips for a classic look.
  7. construction paper
    Construction Paper - Sturdy and comes in a variety of colors.
  8. sheet music paper
    Sheet Music - For a unique and musical twist in quilling designs.

Moreover, engaging in recycling efforts aligns with the growing trend towards environmentally conscious art. By showcasing how you incorporate recycled materials into your work, you can inspire others to follow suit and help reduce waste.

Leverage Social Media for Deals and Inspiration

Social media platforms are treasure troves when it comes to finding deals on quilling supplies or gathering inspiration without spending a penny. Joining Facebook groups dedicated to quilling can lead you to secondhand supplies being sold at lower prices or giveaways from fellow crafters cleaning out their stash.

Quill on a Dime

  1. Instagram quilling supplies sale story
    Instagram Stories - Discover flash sales and discount codes for quilling supplies.
  2. Pinterest DIY quilling strips tutorial
    Pinterest Boards - Find pins linking to tutorials for DIY quilling strips from recycled paper.
  3. Facebook quilling group exchange
    Facebook Quilling Groups - Join communities that share deals and swap quilling materials.
  4. Twitter #QuillingDeals
    Twitter Hashtags - Follow hashtags like #QuillingDeals to stay updated on bargains.
  5. YouTube making quilling strips tutorial
    YouTube Tutorials - Watch videos on how to create your own quilling strips from various paper types.
  6. Reddit quilling on a budget
    Reddit Threads - Engage in discussions about budget quilling and find recommendations for affordable supplies.

Besides deals, platforms like Instagram and Pinterest are filled with creative ideas that might spark your next project. Follow popular quillers and use hashtags such as #quillingart or #paperquillingsupplies to stay updated on trends and techniques.

Where do you find the best quilling inspiration and resources?

Quillers unite! Whether you're a beginner or a seasoned pro, we all need a little inspiration and guidance now and then. Share where you find the most helpful tips, tutorials, and quilling community support!

Incorporating these strategies into your crafting routine will not only help you save money but also connect you with a community of like-minded individuals who share your passion for paper art. This community aspect is invaluable as it provides support, feedback, and friendship—all crucial elements in nurturing creativity.

To further enhance your skills without breaking the bank, consider visiting our comprehensive guides such as "How Can I Learn To Do Quilling Art?" or "Mastering the Basics: A Beginner’s Guide To Using Quilling Paper Strips". These resources are designed to help you refine your technique while being mindful of expenses.

If you're interested in exploring more about cost-effective crafting options or wish to purchase affordable supplies, don't hesitate to check out our sections on "The Cost Of Quilling Supplies And Products" or "Finding Quilling Supplies For Home Decor Projects". With the right approach and resources at hand, you'll be creating exquisite quilled art without straining your wallet in no time!

Remember that every artist starts somewhere, and constraints often breed creativity. By using these tips for finding and making affordable quilling strips, you're not just saving money; you're embarking on an inventive journey that will make each piece uniquely yours. Embrace the challenge of working within a budget—it might just lead you to discover new techniques and styles that will define your artistic voice.

Quilling Strips on a Shoestring: Your Questions Answered

Can I make my own quilling strips, and how?
Yes, you can make your own quilling strips by cutting thin strips of paper with a craft knife or paper shredder. Use lightweight cardstock, construction paper, or even recycled paper to keep costs down. Ensure that the strips are cut evenly to make your quilling projects look neat and professional.
✂️
What type of paper is best for making quilling strips on a budget?
For budget-friendly quilling, look for lightweight cardstock, construction paper, or recycled paper such as old book pages, envelopes, or colored flyers. These materials are often readily available and inexpensive, making them ideal for quilling without breaking the bank.
📜
How can I ensure my handmade quilling strips are uniform in size?
To ensure uniformity in your handmade quilling strips, use a ruler and a craft knife with a cutting mat for precise measurements and cuts. Alternatively, you can create or purchase a quilling strip cutting guide, which can help you quickly and consistently cut strips to the same width.
📏
Are there any tools that can help me cut multiple quilling strips at once?
Yes, a paper shredder with the ability to cut strips in the desired width can be a time-saver for making multiple quilling strips at once. Additionally, some crafters use a quilling strip cutting tool or a DIY template made from cardboard to streamline the process.
🛠️
Is it possible to color my own quilling strips if I only have white paper?
Absolutely, you can color white paper using markers, watercolors, or inks to create custom-colored quilling strips. This allows for a wide range of color choices and can be a cost-effective way to match specific colors for your quilling projects.
🎨

As we wrap up this guide on budget-friendly quill crafting, remember that the value of art isn't determined by the price tag of its materials but by the creativity and joy infused into every coil and curve. So let's keep rolling those strips—frugally—and watch as our imaginations turn simple paper into spectacular art!

Jacob Lee
Quilling, art history, teaching, traveling

Jacob is a professional quilling artist who has won numerous awards for his stunning designs. He enjoys teaching others about the art of quilling and sharing his knowledge and expertise.

Post a comment

0 comments